Wednesday, December 16, 2015
Visit the: Sew Beautiful Blog: How to Tie a Perfect Sash Bow
While perusing I found this tutorial at the Sew Beautiful blog. (There is a link below) At Christmas time, so many little girls wear dresses with big bows. Make sure you know how to tie a lovely sash. It is so easy with this tip. Enjoy today's tip.
Visit the listing below to learn how to tie the sash pictured here. (this picture is from Sew Beautiful Blog.)
Sew Beautiful Blog: How to Tie a Perfect Sash Bow: The holiday season is in full swing, and many of us will soon dress our little girls up in pretty stitched party dresses as we celebrate Chr...
Wednesday, August 19, 2015
An Inexpensive Art Project for Kids: Puffy Paint and Glue Equals FUN!
Are you looking for a simple and inexpensive art project to do with the kids?
I am sharing one here that is very simple and costs very little. We have experimented a great
deal with this project. You can alter the project and make other animals or items by adding just a bit of food coloring to make multiple colors.
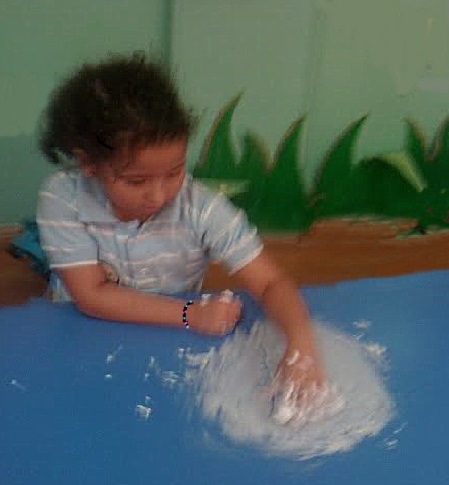
This project might be a little messy but your children will have lots of fun! This is a great project to encourage your children to express their artistic talent and use their imagination.
Now before I get ahead of myself, perhaps it would be best to give a list of supplies. If you are like me, that is the first thing I look at determine if I might have the items around the house. For many of you, I think you will be in luck as these common items are in most every home.
List of supplies needed:
*Craft paper, paint paper, construction paper or any type heavy paper your kids can paint on
*A can of shaving cream. (You can pick one of these us for about $1)
*a smock for the kiddies, or perhaps and old adult t-shirt or just old clothes will work too.
*food coloring (you will only need a small bit IF you decide to make different colors. If you don't have food coloring, don't worry, your children can make all types of puffy pictures by using only white.
*paint brush (optional) to paint pictures OR just use your fingers
*a craft stick or something to mix the shaving cream and glue and to mix colors
*paper plates, or Styrofoam plates or anything to mix "paint" in
*scissors (optional) These can be used to cut small pieces of construction paper if you want to decorate your child's drawing
*school glue
*newspaper or a plastic table cloth or something to protect surface (optional if your children are painting on a surface you want to protect.
NOTE* Always supervise young children during this project as shaving cream and glue are not an edible products.
Directions:
Mix shaving cream and glue in equal parts. Use a craft stick to stir colors.
If you choose to have other colors, separate some of the mixture in other containers. Make colors by adding a drop or two of food food coloring.
Paint tips:
Unlike regular paint, shaving cream paint can be used in big globs to make three dimensional paintings. When your children are finished painting, set the art work aside and allow to dry over night.
Accents: You may cut small pieces of construction paper to accent your drawing while it is wet. An example might be: if making a snowman, you could add a small orange construction paper nose or black pieces or paper for buttons.
You can also accent with scraps of material or other small craft items. Use whatever your have on hand. Let your children's imagination soar. You might be really surprised what they come up with.
What to do if you don't have shaving cream:
Try mixing a bit of child safe paint with some hand lotion for some nice finger paint. The little ones will love it. It won't dry puffy, but they will still have lots of fun. The clean up seems a bit better when a little hand lotion is mixed in with the paint.
This is a wonderful project. Your children will love it and so will your budget.
I hope you enjoy it.
Thanks for stopping by my blog today.
I hope you will visit again soon.
I am sharing one here that is very simple and costs very little. We have experimented a great
deal with this project. You can alter the project and make other animals or items by adding just a bit of food coloring to make multiple colors.
This project might be a little messy but your children will have lots of fun! This is a great project to encourage your children to express their artistic talent and use their imagination.
Now before I get ahead of myself, perhaps it would be best to give a list of supplies. If you are like me, that is the first thing I look at determine if I might have the items around the house. For many of you, I think you will be in luck as these common items are in most every home.
List of supplies needed:
*Craft paper, paint paper, construction paper or any type heavy paper your kids can paint on
*A can of shaving cream. (You can pick one of these us for about $1)
*a smock for the kiddies, or perhaps and old adult t-shirt or just old clothes will work too.
*food coloring (you will only need a small bit IF you decide to make different colors. If you don't have food coloring, don't worry, your children can make all types of puffy pictures by using only white.
*paint brush (optional) to paint pictures OR just use your fingers
*a craft stick or something to mix the shaving cream and glue and to mix colors
*paper plates, or Styrofoam plates or anything to mix "paint" in
*scissors (optional) These can be used to cut small pieces of construction paper if you want to decorate your child's drawing
*school glue
*newspaper or a plastic table cloth or something to protect surface (optional if your children are painting on a surface you want to protect.
NOTE* Always supervise young children during this project as shaving cream and glue are not an edible products.
Directions:
Mix shaving cream and glue in equal parts. Use a craft stick to stir colors.
If you choose to have other colors, separate some of the mixture in other containers. Make colors by adding a drop or two of food food coloring.
Paint tips:
Unlike regular paint, shaving cream paint can be used in big globs to make three dimensional paintings. When your children are finished painting, set the art work aside and allow to dry over night.
Accents: You may cut small pieces of construction paper to accent your drawing while it is wet. An example might be: if making a snowman, you could add a small orange construction paper nose or black pieces or paper for buttons.
You can also accent with scraps of material or other small craft items. Use whatever your have on hand. Let your children's imagination soar. You might be really surprised what they come up with.
What to do if you don't have shaving cream:
Try mixing a bit of child safe paint with some hand lotion for some nice finger paint. The little ones will love it. It won't dry puffy, but they will still have lots of fun. The clean up seems a bit better when a little hand lotion is mixed in with the paint.
This is a wonderful project. Your children will love it and so will your budget.
I hope you enjoy it.
Thanks for stopping by my blog today.
I hope you will visit again soon.
Friday, August 7, 2015
Build A Craft Stick Catapult With Your Kids. Summer Fun Tutorial
Are you looking for something both fun and frugal to do with your kids for a summer activity?
Something that would occupy hours of family fun and guarantee laughter, all while not draining the family bank account? If you are, you are not alone. Many families find themselves in this predicament over summer. This is the time when families are supposed to have fun together. Besides having fun with my children, I am always trying to come up with activities for children at our community center as well. Building this inexpensive catapult definitely was a big hit with all the children of varying ages who built one. This toy brought hours of fun to many. I am sharing this here so that you can build one too.
What you need:
Tongue depressor's or craft sticks (we used 8 for each catapult)
Rubber bands
Plastic soda or water bottle cap
Hot Glue or glue to attach plastic lid to catapult. (We used hot glue because it was faster )
Optional:
Something to use in the catapult as ammunition (we used a small plastic bird that resembles those other birds that are so angry)
Markers and/or items of choice to decorate your catapult
Directions:
Begin by putting 2 craft sticks together. Rubber band only one end together.
Next, stack 6 sticks one on top the other. Rubber band the stack together at each end.
Slide the stack of 6 inside the initial 2 sticks so that the 2 sticks are spit apart. Slide the stack in to the
banded side of the two sticks.
Next, use a rubber band to attach the set of two sticks together at the center point of where they connect or intersect.
Using hot glue (or craft glue if you prefer) attach the bottle cap to the top of the open end of the two sticks.
**Please do not allow children to use or operate a hot glue gun. This should be done by adults only!
Use markers or any other items you like to decorate your catapult. As you can see, we used markers and glued a feather to the end.
We placed our bird in the cap. You might choose to use another item for ammo such as an eraser,marshmallow or even crumpled paper.
To fire your catapult, place your ammo of choice in the bottle cap. Push down on the end and release. Remember to wear safety glasses and to shoot in only one direction.
If your catapult doesn't shoot in the direction you like or shoots too high, you can adjust the position of the craft stick bundle to change the direction of your fired ammo.
*You will need some item to stack up so that your catapult can knock it down. We used stacked wooden blocks. You may stack all sorts of items, such as plastic action figures or small plastic cups, etc. Shoot to knock down stacks of something or aim to land in a small waste basket.
The children built lots of catapults and had hours of fun. This is a great summer project.
Have fun building your catapult.
Thanks for visiting my blog today.
Labels:
Crafts for Kids,
Fun Friday,
Homeschool,
summer,
toy,
tutorial
Wednesday, June 10, 2015
4th of July summer dresses for little girls...pageant or picnic! Ready to ship!
Today I am featuring festive, patriotic dresses in my Etsy shop. (You can find a link to my Etsy site in the right hand column of this blog or simply click the photo.) These dress are brand new, unworn and available in little girls sizes 18 months, 24months, 2t, 3t, 4/5, 6/8, 10/12. The dresses have a knit top with a jeweled butterfly on the front.

The bottom of the dress is a double circle skirt dress. The bottom layer is red stripes and the over layer is blue with stars. Both skirt fabrics have a bit of sparkle to them.
All edges are well finished and serged. This dress would be perfect for the 4th of July. Wear it to a picnic or a pageant for themed casual wear. Great for summer! Cute for any outing and pictures too!
This one is ready to ship. I will do my best to ship the same day that payment has cleared.
**Please note, the dress is shown with a petti-slip which is NOT included in the listing. Only the dress is being sold. I have no more of this fabric left, so this will be the only one like this for sale.
While you are shopping, why not consider a custom order for a pair of boutique beaded socks or perhaps a handmade hair bow? (photos available) Ask me about socks or bow just for you. (I can match most any outfit)
Thanks for stopping by my blog today.
Labels:
4th of July,
boutique,
Etsy,
feature,
gift,
girls,
God Bless America,
handmade,
one of a kind,
pageant,
Patriotic,
summer
Wednesday, April 1, 2015
Make an old fashioned bunny cake
Did you ever make bunny cakes when you were young? Perhaps your mother or grandmother made them for you at Easter. I have had several people ask me about how to make them. I know I have those books packed away somewhere so I went online trying to find a diagram on how to make them.
I found a couple picture diagrams on a web site that I like which came from a book printed years ago.
Head on over to The Junk Yard Clubhouse to find this and other directions. Here is the link to their site.
http://www.junkyardclubhouse.com/2007/04/07/bakers-coconut-easter-bunny-cut-up-cake/
You can also click the photos to go straight to their site.
Thanks for stopping by,
Thursday, March 26, 2015
Healthy Frozen Treat on a Stick
Tasty Treats Straight From The Freezer
Summer will be here before we know it. It is time to plan ahead and look for healthy treats instead of those laden with extra sugars and chemicals. Instead of
frozen treats from the store, let the kids make their own treats. Use cookie
cutters to cut out fun shapes from a 1-inch-thick slice of seedless watermelon.
Insert a Popsicle stick into the bottom; place on foil and put in the freezer.
Frozen grapes and berries are also great.Friday, January 16, 2015
2015 modeling faces winner announcement.
Bella Sera Boutique would like to announce our winners for our little modeling faces contest for 2015. (Contest was announced in August 2014) These two little elf's are real cuties. We had many photo submissions. It was a difficult choice but the final two winners have been chosen. Have your ever seen such cute little elf's? (Names of the winners will not be posted unless parental permission is given.) Our two winners are shown here and parents of each will be contacted. You will be seeing these smiling faces on much of our printed promotional material used throughout this year. Congratulation to these 2 little elf's. Using photo submissions, our digital artist has created a winning Christmas picture for us. (Our digital artist will also contact the parents of these winners with their winning digital photo package.) Congratulations winners! We are excited to be working with both you and your parents in 2015.
Thursday, September 18, 2014
Harsh winter ahead? How to make an easy upcycled dog sweater to keep your dog warm
Read on for a descriptive tutorial on how I made these 2 dog sweaters from one upcycled sweater!
Before I go further, I think it only fair to give credit to Benjamin Franklin, who first published Poor Richard's Almanack (sometimes Almanac) in 1732. Franklin adopted the pseudonym of "Poor Richard" or "Richard Saunders" for the purpose of publishing the almanac until 1758. This was no shabby publication in the American colonies as it reach upward of 10,000 per year. Quite an impressive accomplishment, to be sure!
Poor Richard's Almanack influenced other almanac publications. Today, we have the Farmers' Almanac. It contains a wealth of interesting information. Many people hold fast to the advice printed within the Farmers' Almanac, while others take the weather predictions with a grain of salt or deny the validity of any statements within altogether. This year's Farmers' Almanac predicts the following weather in the United States for winter:
According to the 2015 edition of the Farmers’ Almanac, the winter of 2014–15 will see below-normal temperatures for about three-quarters of the nation. A large zone of very cold temperatures will be found from east of the Continental Divide east to the Appalachians. The most frigid temperatures will be found from the Northern Plains into the Great Lakes. The coldest outbreak of the season will come during the final week of January into the beginning of February, when frigid arctic air drops temperatures across the Northern Plains to perhaps 40 below zero. As the frigid air blows across the Great Lakes, snow showers and squalls will drop heavy amounts of snow to the lee of the Lakes.
(source: http://farmersalmanac.com/weather/2014/08/24/2015-us-winter-forecast/)
I looked around at dog sweaters in various stores and was not pleased with the ones that I found. Many seemed to be made of inferior fabric, had poor quality workmanship or were priced outrageously. I looked high and low and found nothing that was made well or was within my budget. I decided that I might try to fashion a few dog sweaters by up-cycling a pretty sweater that a member of my family had outgrown. My thought was that if I failed, I had lost nothing, but if I succeeded, my dogs would have lovely, handmade, one of a kind, matching sweaters and I would have saved a bundle by upcycling. It also felt pretty good knowing that I would be doing something nice for our planet. Seemed like a win / win situation to me.
This first thing I did was to search for a sweater that was large enough to fashion a matching sweater for both my dogs. I began with a child size colorful acrylic sweater that I retrieved from our intended donation bin. Acrylic is ideal for tossing in the washer and dryer when time to launder. (Another savings! No dry cleaning cost!) I neglected to take a photograph of the sweater before I started. I did, however, take one after laying the sweater flat and making my first cut.
Note: If you intend to try this at home (and I hope you do) be forewarned that this can be a bit messy as lots of little pieces "come out" of the sweater when cut.
As you can see, the sweater had a large fold down neck that one might almost call a turtle neck, though not quite. I did not bother this neck as it seemed perfect for the larger of my dogs. The sweater had an inside out sort of look to the fabric which lent itself well to dog sweaters, or so I believe.
The main portion, or body of the sweater, would be used for my larger dog and the sleeves for my smaller dog. The waist band would be removed and used for arm holes for both sweaters. ( I just smoothed the sweater flat and cut the waist band straight off, leaving enough sweater to use for seam allowance. This was minimal. I then cut the band into 4 carefully measured pieces which I used for sleeves.) The arm cuff of the sleeve was left on for use as a neck for my smaller dog. My smallest dog weighs just over 5 pounds, so I altered the neck by tapering it just a little so as to fit her well.
Measure your dog from the base of his or her neck to base of tail. Allow for seam allowance. This piece will be the piece that lays on top of your dog's back. It should be cute from the front of the sweater if you plan to include the sweaters existing neck, as I did. Make sure to get your top piece long enough to come to the base of the tail with a little extra for seam allowance. The piece will be wide at this point. You can determine how wide you need the piece to be later.
Next, measure from base of neck down belly, stopping a few inches before rear legs. Again, allow for a small seam allowance. Measure around your dog at the widest part. Make sure the width of both top and bottom piece will allow enough room to go around your dog's body. Again, don't forget seam allowance. Your second piece will be fashioned by the back of the sweater. Seam allowance should be about 1/2 inch at the sides. You will need to determine how wide your pieces need to be according to the measurements of your own dog. Once you have determined how wide the top and bottom pieces need to be in order to establish needed width, can cut pieces accordingly. Place right sides of both pieces together or in other words, turn your item inside out. Pin both pieces in place to prepare for sewing. Leave small opening where the sleeves will go. You can determine how far down to leave sleeve hole openings by measuring from neck to base of leg. Sew up the sides all but the opening for the sleeves or leg holes.
OR:
1. measure dog
a) length of dog from the top of the front leg over the back to the top of the other front leg
b) length from base of the neck (where the collar would sit) to the base of the tail
c) distance around thickest part of the body
d) length from the neck to where you want the sweater to end underneath (shorter length for boys)
I used the waist band to fashion the sleeves. In this case, I measured them for circumference and sewed them in a circle first and then put them in the opening I left in the side seam for their insertion. This is best established by pinning them in place before sewing. I also found that it was easier for me to sew the entire sweater by hand before heading to the sewing machine. I basted all seams first and then tried the sweaters on my dogs for fit. The trying on was done far more than I might have hoped. ( I think my dogs were getting tired of me trying the sweaters on them and they finally went to hide. I can't blame them. I would have grown weary too.) The basting worked out well since I had to make quite a few alterations as I went along. It is much easier to remove a basted seam than one that has been securely sewn on the sewing machine. The seam ripper tends to damage the sweater fiber, so I suggest you do as I did and baste by hand first.
Because I put the sleeves in the side seam of the sweaters, I had to take a couple darts in the excess chest material. Depending on the fullness of your dogs chest, you may not have to do this. It was necessary for mine. I turned the sweaters inside out and made a tiny dart just to the inside of each sleeve in the chest area. This is made like a "v" shape. I didn't take a picture of this, but I am sure you can find simple directions on either You Tube, by internet search or in most any sewing manual. I could have made my chest darts deeper, but I elected no to do so because I wanted to allow room for winter hair growth and the size of the tags that hang from the collars of my dogs. When making your sweater, if you make darts, you will have to determine the size according to your dog. If they are not deep enough initially, they are simple to redo. (Again, I recommend basting first before heading to the sewing machine.)
The above photograph shows the finished sweaters as you would see them when viewing the dogs back. As you can see, the end of the sweater (the part near the dog's tail) ends just above where the tail begins. (I allowed about 3/4 to 1 inch seam allowance here to accomplish the rolled hem look.) If you look closely here, you can see that the tail region on top has a hand rolled hem. To achieve this, I simply rolled the sweater material to the inside a bit, giving it a rounded appearance. I basted it in place. I saw this look on a very expensive dog sweater on line. I love the look and was thrilled to find that it could be quite easily accomplished.
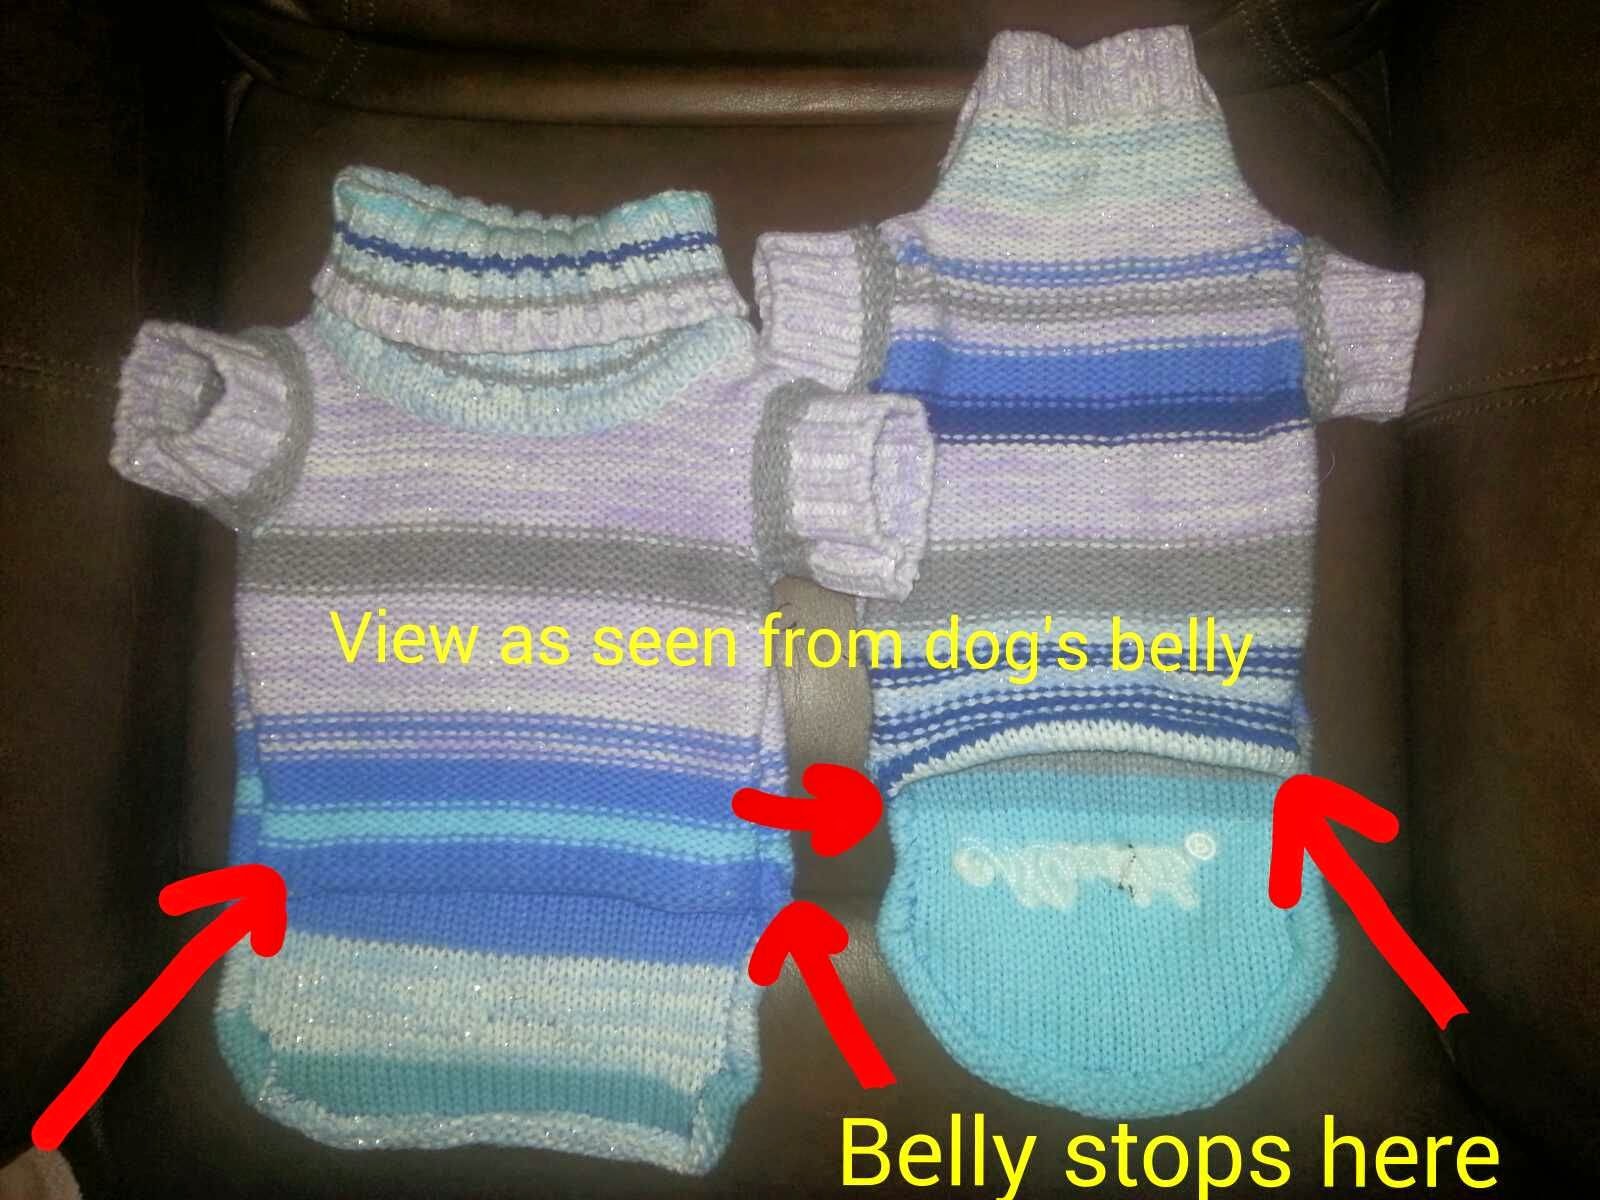
The underside, or belly area stops a few inches before the legs (see the red arrows).
I made a rolled hem here as well simply by rolling the sweater fabric to the inside and basting across. The sweater needs to end several inches before the business area of your dog so they do not soil their sweater when urinating. (If your dog is a male, you may want to end the belly area just a bit higher and refrain from allowing too much sweater to hang down.) No two dogs are exactly the same, so you will need to try your sweater on your dog and use your dog's measurements when making a sweater. I used a child's sweater to fashion my two dog sweaters. If your dog is larger, you will, of course, need to use a larger sweater.
Note: you could easily fashion rear leg straps on the sweater. I have seen many sweaters made with them. I did not elect to put them on my sweaters but it could be achieved quite easily.
Once your sweater has been basted and you have tried your sweater on your dog for a final fitting, you are ready to head to the sewing machine to sew over all basted hems.
These two sweaters took me a bit of time to make but in the end, I feel it was worth my effort. I learned a bit, as did my daughter, who is learning to sew. I will likely try upcycling a sweater to make my dogs another sweater / coat at some point in the future. These will do nicely for the winter. Just think....they didn't cost me anything to make!
After reading my tutorial, I hope you are inspired to try upcycling a sweater to make a winter sweater / coat for your dog too. If you don't have a dog, perhaps your cat would like one. If you have no pet, perhaps you could make one for the pet of a friend or neighbor or maybe even make a few to donate to your local animal shelter or rescue.
If you have questions, feel free to contact me. I will do my best to help you.
Happy upcycling!
Thanks for visiting my blog today,
Kassie
Winter is soon coming, and if we heed the prediction of the Farmer's Almanac, I am told we are in for a pretty fierce winter.
Before I go further, I think it only fair to give credit to Benjamin Franklin, who first published Poor Richard's Almanack (sometimes Almanac) in 1732. Franklin adopted the pseudonym of "Poor Richard" or "Richard Saunders" for the purpose of publishing the almanac until 1758. This was no shabby publication in the American colonies as it reach upward of 10,000 per year. Quite an impressive accomplishment, to be sure!
The very popular Almanack offered up a calendar, seasonal weather forecasts, practical household hints and tips, word play, witty phrases, puzzles, proverbs, astrological information, on going stories and much more. The Almanack also served as a reflection of the norms and social mores of American colonial times. There is much to learn from studying that era in time. If you have not read about it, I would encourage you to do so. It is quite interesting. It is a great homeschool lesson and there is almost no end to the avenues of study one might embark upon as a spin off from this lesson.
Poor Richard's Almanack influenced other almanac publications. Today, we have the Farmers' Almanac. It contains a wealth of interesting information. Many people hold fast to the advice printed within the Farmers' Almanac, while others take the weather predictions with a grain of salt or deny the validity of any statements within altogether. This year's Farmers' Almanac predicts the following weather in the United States for winter:
According to the 2015 edition of the Farmers’ Almanac, the winter of 2014–15 will see below-normal temperatures for about three-quarters of the nation. A large zone of very cold temperatures will be found from east of the Continental Divide east to the Appalachians. The most frigid temperatures will be found from the Northern Plains into the Great Lakes. The coldest outbreak of the season will come during the final week of January into the beginning of February, when frigid arctic air drops temperatures across the Northern Plains to perhaps 40 below zero. As the frigid air blows across the Great Lakes, snow showers and squalls will drop heavy amounts of snow to the lee of the Lakes.
(source: http://farmersalmanac.com/weather/2014/08/24/2015-us-winter-forecast/)
Dogs and Winter Weather:
Wherever you stand on your belief of the weather forecast in the current almanac, should the predictions prove true, your pets might thank you when going outside if they have some sort of sweater or covering to help keep them warm and the snow off their bodies. Now before I go on, I will say, "Yes! I know they have fur," but if your dog spends a lot of time outside in the elements, or, if your dogs are like mine and go out only to relieve themselves, they might need a sweater for extra warmth. Seeing a dog shiver in the snow, ice or cold weather is not a pretty sight. My small dogs are not used to staying out in the cold. When I take them outside, even if for a short while, they shiver quite a bit. A sweater seems quite a good idea for helping to keep them warm. (While I am on the subject, dog boots are a fantastic idea for protecting your dog's feet from damage or injury related to snow and ice exposure.)
I looked around at dog sweaters in various stores and was not pleased with the ones that I found. Many seemed to be made of inferior fabric, had poor quality workmanship or were priced outrageously. I looked high and low and found nothing that was made well or was within my budget. I decided that I might try to fashion a few dog sweaters by up-cycling a pretty sweater that a member of my family had outgrown. My thought was that if I failed, I had lost nothing, but if I succeeded, my dogs would have lovely, handmade, one of a kind, matching sweaters and I would have saved a bundle by upcycling. It also felt pretty good knowing that I would be doing something nice for our planet. Seemed like a win / win situation to me.
Here are the sweaters I made for my dogs. Please excuse their disheveled hair. The poor things had tried on the sweaters more than a half dozen times as I was making these .
How I made my dog sweaters:
I am going to attempt to give a brief, though not extensive, descriptive tutorial here (you can find many tutorials on the internet for making upcycled dog sweaters). I had no pattern to make these sweaters. Mine were fashioned by trial and error. I will do my best to explain to you how I made them. If you intend to attempt to make an upcycled sweater for your dog, I encourage you to measure your dog, and then remeasure before cutting. Your sweater must be large enough to get on and off your dog fairly easily but snug enough so as not to be sloppy or become easily soiled or snagged when your dog is outside.Note: If you intend to try this at home (and I hope you do) be forewarned that this can be a bit messy as lots of little pieces "come out" of the sweater when cut.
As you can see, the sweater had a large fold down neck that one might almost call a turtle neck, though not quite. I did not bother this neck as it seemed perfect for the larger of my dogs. The sweater had an inside out sort of look to the fabric which lent itself well to dog sweaters, or so I believe.
The main portion, or body of the sweater, would be used for my larger dog and the sleeves for my smaller dog. The waist band would be removed and used for arm holes for both sweaters. ( I just smoothed the sweater flat and cut the waist band straight off, leaving enough sweater to use for seam allowance. This was minimal. I then cut the band into 4 carefully measured pieces which I used for sleeves.) The arm cuff of the sleeve was left on for use as a neck for my smaller dog. My smallest dog weighs just over 5 pounds, so I altered the neck by tapering it just a little so as to fit her well.
Measure your dog from the base of his or her neck to base of tail. Allow for seam allowance. This piece will be the piece that lays on top of your dog's back. It should be cute from the front of the sweater if you plan to include the sweaters existing neck, as I did. Make sure to get your top piece long enough to come to the base of the tail with a little extra for seam allowance. The piece will be wide at this point. You can determine how wide you need the piece to be later.
Next, measure from base of neck down belly, stopping a few inches before rear legs. Again, allow for a small seam allowance. Measure around your dog at the widest part. Make sure the width of both top and bottom piece will allow enough room to go around your dog's body. Again, don't forget seam allowance. Your second piece will be fashioned by the back of the sweater. Seam allowance should be about 1/2 inch at the sides. You will need to determine how wide your pieces need to be according to the measurements of your own dog. Once you have determined how wide the top and bottom pieces need to be in order to establish needed width, can cut pieces accordingly. Place right sides of both pieces together or in other words, turn your item inside out. Pin both pieces in place to prepare for sewing. Leave small opening where the sleeves will go. You can determine how far down to leave sleeve hole openings by measuring from neck to base of leg. Sew up the sides all but the opening for the sleeves or leg holes.
OR:
1. measure dog
a) length of dog from the top of the front leg over the back to the top of the other front leg
b) length from base of the neck (where the collar would sit) to the base of the tail
c) distance around thickest part of the body
d) length from the neck to where you want the sweater to end underneath (shorter length for boys)
I used the waist band to fashion the sleeves. In this case, I measured them for circumference and sewed them in a circle first and then put them in the opening I left in the side seam for their insertion. This is best established by pinning them in place before sewing. I also found that it was easier for me to sew the entire sweater by hand before heading to the sewing machine. I basted all seams first and then tried the sweaters on my dogs for fit. The trying on was done far more than I might have hoped. ( I think my dogs were getting tired of me trying the sweaters on them and they finally went to hide. I can't blame them. I would have grown weary too.) The basting worked out well since I had to make quite a few alterations as I went along. It is much easier to remove a basted seam than one that has been securely sewn on the sewing machine. The seam ripper tends to damage the sweater fiber, so I suggest you do as I did and baste by hand first.
Because I put the sleeves in the side seam of the sweaters, I had to take a couple darts in the excess chest material. Depending on the fullness of your dogs chest, you may not have to do this. It was necessary for mine. I turned the sweaters inside out and made a tiny dart just to the inside of each sleeve in the chest area. This is made like a "v" shape. I didn't take a picture of this, but I am sure you can find simple directions on either You Tube, by internet search or in most any sewing manual. I could have made my chest darts deeper, but I elected no to do so because I wanted to allow room for winter hair growth and the size of the tags that hang from the collars of my dogs. When making your sweater, if you make darts, you will have to determine the size according to your dog. If they are not deep enough initially, they are simple to redo. (Again, I recommend basting first before heading to the sewing machine.)
I made a rolled hem here as well simply by rolling the sweater fabric to the inside and basting across. The sweater needs to end several inches before the business area of your dog so they do not soil their sweater when urinating. (If your dog is a male, you may want to end the belly area just a bit higher and refrain from allowing too much sweater to hang down.) No two dogs are exactly the same, so you will need to try your sweater on your dog and use your dog's measurements when making a sweater. I used a child's sweater to fashion my two dog sweaters. If your dog is larger, you will, of course, need to use a larger sweater.
Note: you could easily fashion rear leg straps on the sweater. I have seen many sweaters made with them. I did not elect to put them on my sweaters but it could be achieved quite easily.
Once your sweater has been basted and you have tried your sweater on your dog for a final fitting, you are ready to head to the sewing machine to sew over all basted hems.
These two sweaters took me a bit of time to make but in the end, I feel it was worth my effort. I learned a bit, as did my daughter, who is learning to sew. I will likely try upcycling a sweater to make my dogs another sweater / coat at some point in the future. These will do nicely for the winter. Just think....they didn't cost me anything to make!After reading my tutorial, I hope you are inspired to try upcycling a sweater to make a winter sweater / coat for your dog too. If you don't have a dog, perhaps your cat would like one. If you have no pet, perhaps you could make one for the pet of a friend or neighbor or maybe even make a few to donate to your local animal shelter or rescue.
If you have questions, feel free to contact me. I will do my best to help you.
Happy upcycling!
Thanks for visiting my blog today,
Kassie
Labels:
dog,
handmade,
Helpful Household Hints,
Homeschool,
made to match,
one of a kind,
pet friendly,
sewing,
sweater,
tutorial,
upcycle,
winter
Subscribe to:
Posts (Atom)


.jpg)


.jpg)