The most affordable way to take a 5-star vacation (Click Below)

Click here for a Westgate Resorts Vacation
Click this logo to find out how to take a magical vacation
Click here to visit Bella Sera Boutique Blog

Friday, September 9, 2016

Do You Know The Symptoms Of Ovarian Cancer? Learn to recognize the WHISPERING sounds!


THE TRUTH IS that most women, and in fact, most people, don't think much about Ovarian Cancer. Most don't know the symptoms of one of the most deadly forms of women's cancer. Each year, approximately 21, 980 women will be diagnosed with ovarian cancer and approximately 14,270 women will die. The World Health Organization IARC department estimated that there are over 238, 000 new cases diagnosed annually and nearly 152, 000 deaths worldwide.

The cancer TYPICALLY occurs in women in their fifties and sixties with the median age being 63. Many women who are diagnosed with Ovarian cancer have a genetic history that may include carrying the BRCA mutation gene and having a strong family history of ovarian cancer.

Unfortunately, many women don't seek help until the disease has begun to spread, but if detected in its earliest stage, the five-year survival rate is more than 93% The symptoms of ovarian cancer are often subtle and easily confused with other ailments.

Symptoms of ovarian cancer can be difficult to pinpoint and are often mistaken for symptoms of less serious conditions, such as Irritable Bowel Syndrome. These are the signs to look out for:
  • Persistent stomach pain
  • Persistent bloating
  • Finding it difficult to eat or feeling full quickly
  • Urinary symptoms (urgency or frequency) 
Other symptoms you may notice include:
  • Back pain
  • Changes in your bowel habits (diarrhea or constipation)
  • Feeling tired all the time
  • Weight gain
  • Nausea
  • Indigestion
  • Gas
  • Shortness of breath


There is no adequate screening test of ovarian cancer at this time which is one of the reasons that this cancer is often discovered in later stages.

Talk to your doctor if symptoms last more than 2-3 weeks or if you have been experiencing any of these symptoms on most days. You are your best advocate.


It is true! September is National Ovarian Cancer Awareness Month and that means that more people will be openly talking about the symptoms of ovarian cancer in attempt to try and raise awareness about this deadly cancer. If I didn't think that was a good thing, I wouldn't be focusing an entire post to the subject of raising awareness of the symptoms of ovarian cancer. We must get the information to the masses. I implore you to spread the word, if only to save the life of even one other person. It shouldn't be a taboo subject. The person you share this information with might well be the person that really needs to hear the information. The thing is, while I am on board 100% with raising awareness this month, that simply isn't enough! It isn't enough to think about or talk about these symptoms for the month of September and then forget about them as the next type of awareness month rolls around.
This cancer sneaks up on you! The symptoms whisper! Often times, the person who is diagnosed didn't even realize anything was wrong until they heard the doctor give them the dreaded diagnosis. Ovarian Cancer symptoms WHISPER! You may notice only a slight irregularity in what you consider to be normal symptoms. This is why women must pay close attention to their bodies.

Because I am a woman, this cause is important to me, but it should be important to anyone who has a woman in their life as well. Ovarian cancer took the life of my best friend in the world, my Mother. The symptoms didn't manifest in a way that made her notice and by the time she realized anything was "not normal," her cancer had progressed to a place of great concern. Too often this is the case with those who are diagnosed. Because I don't want anyone in the world to experience the heartache that I experience on a daily basis from missing my mother, I earnestly request that you pass this information on to every woman in your life. It will only take a moment to pass this information on but your actions could change the life of someone forever!
Thanks for visiting my blog today and taking the time to read this message.

Wednesday, March 9, 2016

An Easter Bunny Purse or basket...Ready to ship to your little chick!

Little Bunny Purse with carrot
(Can also be used as an Easter basket and then as a purse

READY TO SHIP!
Back by popular demand is my little Easter purse. This can also double as a small basket that can be also used as a purse. I have had several people use this purse well beyond Easter. I offered this purse a few years ago and it has been popular as a special order ever since. I have one purse made at present and ready to ship. I don't believe I will have time to make another one before Easter, so if you want one before Easter, I would encourage you to snap that one up. You can find a listing for it in my Etsy store.


h


About the purse:
This one is crocheted and can be used as a purse or small tote. Could easily be used for an Easter basket too. It is stitched with precision and has lots of extra added touches done with hand embroidery. Bunny is accented with a flower on her head and her trusty carrot nearby. It is a great accessory item or gift and would be great for little girls and big too. Pageant girls might like this one too. You can find this one in my Etsy atores. (You can find links to my etsy store on the right hand column of this blog.)

You may also click HERE to go directly to the listing for this cute bunny purse:


If you are interested in this bag as a custom made to match item, contact me about a custom in colors made just for you. If you want something made that you don't see listed, please ask. I sell on various venues and only offer a limited amount of items in my etsy store. You can find a link to contact me in my Etsy store.

Happy Easter and happy shopping!
Thanks for visiting my blog today,

Bunny Cup Decoration --- Craft for Kids


Looking for an easy craft for kids. Make a simple bunny cup. 

You will need the following:
1 white plastic cup
1 black sharpie marker 
One sheet of craft foam in color you would like ears and nose to be
One sheet of white craft foam
Craft glue 
Scissors
2 white or clear drinking straws OR 2 white pipe cleaners
1 set of plastic moving eyes in desired size
One small piece of either thread or yarn (to tie nose pieces together)
One cotton ball OR small pom pom in white to use for tail (optional)

Optional: Easter grass in desired color. 
You may flip your cup over and fill it with Easter grass and treats if desired. 

Directions:
Cut small triangular shape and shapes for nose and inner ears out of colored foam sheet. 
Cut 2 ears slightly larger than colored pieces for back of ears from sheet of white foam. 
Glue colored piece of foam to white ear background. Allow to dry. Glue in place when dry on back of cup wherever you would like ears placed.
Place straws in and "X" shape on top of small piece of either string, thread or yarn and tie in center. 
Clip end pieces of thread short. Glue straw "X" piece to cup. Glue triangular nose piece on top of straws with point of triangle pointing downward. Glue eyes on cup above nose as desired place. 
Using sharpie marker, draw on mouth. Glue cotton ball or pom pom to back of cup to serve as tail. 


Please note: This craft should be supervised if around young children. 

Thanks for stopping by

Friday, January 8, 2016

How to break in your new high heels. You can look pretty and your feet won't complain.

Have you ever fallen in love with your new shoes but your feet didn't agree with your new found love?


Yes! That has happened to me more times than I care to admit. It seems the more I love the new shoes, the more my feet complain.This is especially true when I find beautiful high heels and wear them without trying to break them in. My heart nearly leaps with joy at the beauty of the heels and I simply can't wait to show them off. My feet almost always complain. I try to ignore their complaints, but after a while, they complain so loudly that I am forced to pay attention, or at least attempt to find a solution that will please the both of us. If this has happened to you as well, you are in luck! I have posted below some ideas to help you break those new heels in so that you and your feet can be friends again. You can look gorgeous and your feet won't complain about your pretty new high heels.  

First of all, the trick is to try and tweak your new shoes a bit before you actually wear them. Here are a few simple ideas that might really help your shoes to feel great on your feet. 

1. Try to buy your shoes in the evening when feet are the most swollen. That will ensure a much better fit. Always buy shoes in your proper size to ensure the most comfortable fit. Wearing shoes that are either too large or too small will almost surely cause you pain. 

2. Give your new shoes a little test run to identify where problem areas might be. Try wearing them around the house to break them in a bit and try to mold them to your feet. Wearing your shoes for extended periods before breaking them in can really cause pain and blisters. 

3. Keep a bit of saddle soap at home to help break in your shoes. 
Run a clean cloth under water and wring out all excess moisture. Next, rub the cloth in a bit of saddle soap until it begins to lather a bit. Then rub the cloth over the area that rubs using a circular motion, covering the entire surface. Next, put the shoes on your feet. 
Why does this work? The saddle soap softens the leather so that it more easily conforms to the shape of your feet. 

4. If you have a place that is rubbing your foot in a certain area, dab a bit of rubbing alcohol on the inside of the shoe. Put on a thick pair of wool or athletic socks with your new shoes. The alcohol makes the leather more pliable and the heavy material of the socks works together with the rubbing alcohol to help the shoe take on the natural shape of your foot. You can dab the rubbing alcohol on the entire area of the inside of the shoe if needed. If you have no rubbing alcohol, try wearing a thick damp sock with your shoes around the house. This helps to stretch your shoe out a bit and helps the shoe conform to your foot. 

5. Place your shoes in the freezer overnight with a double bagged, water filled zip-top baggie inside the heel sections of each one. As the water freezes and the bags expand, your shoe will gradually be stretched out a bit, making the heels a bit wider and more comfortable. If you entire shoe is too tight, you can try the water bag on the inside of the entire heel. (Double bagging is highly recommended.) 

6. Use moleskin on the inside bothersome places of the shoe to keep it from rubbing. Some moleskin pads are meant to go directly in the shoe to keep a shoe from rubbing. 
Another way to use moleskin is to place the moleskin on your feet where your shoe is rubbing. Next, soak your feet and moleskin together in water. The moleskin will expand and will then create a thick barrier between your feet and shoes. Put the shoes on and wear them around so that the expanded moleskin can gradually mold the shoes more to the natural shape of your feet.  Moleskin is sold at most drug store or medical supply stores.

7. Try inserting a foam or gel comfort insole or foot cushion. They normally take on the shape of the shoe and offer increasing comfort of your shoe. Remember to take the time to buy the proper size insole for your shoes.  Some can be trimmed down to size for comfort. Heel cushion inserts can also be most helpful.  Many have an adhesive back so that you get relief of pain without slippage of the pad. 

8. If you are walking and identify an area that begins to rub your foot, you can rub the inside area with a solid deodorant stick or a candle. A travel size deodorant stick is a great thing to carry in your purse for emergency relief of foot pain.

9. Rub the bottom of your shoe with a piece of sandpaper. This helps to alleviate slippage when walking. Another "trick" is to put a piece of duct take on the sole of your shoe. This is temporary but helps with slick surfaces if you have no sandpaper. 


Now, what are you waiting for? Put on those new heels and try the tips above so that you can break your heels in and start showing them off. 

Monday, January 4, 2016

Monday's Musings: Tips and Tricks: How to use a bar of soap for home fixes. Save money and time!


Did you ever wish there was a simpler way to do things?
I have offered some great tips to help you simplify things below. 

Do you love simple tips? Well, if you do, here is one for you.
Did you know that there are more uses for a bar of soap than just to wash your hands or body?


Here are a few tips for using a bar of soap in some unique ways:


Keep Your Hands Clean While Working with Dirty In Dirt or With Dirty Items.
If you are not always the greatest about wearing gloves before doing a messy job, just grab a dry bar of soap. Before working in the garden, digging in the ground or handling oily car parts, simply scratch a dry bar of soap before getting your hands dirty. 
The soap will accumulate under your nails helping you to avoid dirt or buildup under your nails. Clean up is a cinch since all you will have to do is wash your hands and the soap will soften and bubble up and dissolve away rendering your hands much easier to clean. Using a nail brush when washing your hands makes the job really easy.
Fix A Sluggish Zipper
Another great soap tip that has really been of help at our house is for how to make a sluggish zipper work well. Someone is always complaining at my house that their zipper won't work. What is a gal to do? Well, you can try what I do, grab either a dry bar of soap (Or a candle) and rug the zipper in the area that is sluggish. This works like magic most of the time.

Fix A Spot On Your Shoe with Soap
Did you ever have a shoe that was rubbing your foot in one area?


 In a pinch, I have rubbed the area with a dry bar of soap. When I was young and this happened, my mother rubbed the spot with a bar of saddle soap. I don't usually have saddle soap lying around my house, but a regular bar of soap seems to work just fine. You could try this before moving on to other techniques. It has helped me several times.


Keep Wood From Splintering:
Ever drive a nail into wood only to have the wood splinter?

This is a common problem with a very simple fix. Before hammering in your nail, rub the long part of the nail down with a dry bar of soap. Then hammer in as usual. It will keep your wood from splintering.
Using Soap As A Deodorizer:
My last tip for today is to put soap into a mesh bag or even wrapped in a piece of cheese cloth and place in an area that needs to be deodorized. We use them in shoes, drawers, gym bags and golf bags. It is an inexpensive deodorizer that works, in my opinion, every bit as good as more expensive placement deodorizers.


I hope you will find at least one tip I have shared here today helpful. I have a lot of fun finding unusual uses for items around the house. Maybe one of my tips will become one of your favorites.
Thanks for stopping by my blog today.


Wednesday, December 16, 2015

Visit the: Sew Beautiful Blog: How to Tie a Perfect Sash Bow


While perusing I found this tutorial at the Sew Beautiful blog. (There is a link below) At Christmas time, so many little girls wear dresses with big bows. Make sure you know how to tie a lovely sash. It is so easy with this tip. Enjoy today's tip.
Visit the listing below to learn how to tie the sash pictured here. (this picture is from Sew Beautiful Blog.)

Sew Beautiful Blog: How to Tie a Perfect Sash Bow: The holiday season is in full swing, and many of us will soon dress our little girls up in pretty stitched party dresses as we celebrate Chr...

Wednesday, August 19, 2015

An Inexpensive Art Project for Kids: Puffy Paint and Glue Equals FUN!

Are you looking for a simple and inexpensive art project to do with the kids?
I am sharing one here that is very simple and costs very little.  We have experimented a great
deal with this project. You can alter the project and make other animals or items by adding just a bit of food coloring to make multiple colors.


This project might be a little messy but your children will have lots of fun! This is a great project to encourage your children to express their artistic talent and use their imagination.

Now before I get ahead of myself, perhaps it would be best to give a list of supplies. If you are like me, that is the first thing I look at determine if I might have the items around the house. For many of you, I think you will be in luck as these common items are in most every home.

List of supplies needed:
*Craft paper, paint paper, construction paper or any type heavy paper your kids can paint on
*A can of shaving cream. (You can pick one of these us for about $1)
*a smock for the kiddies, or perhaps and old adult t-shirt or just old clothes will work too.
*food coloring (you will only need a small bit IF you decide to make different colors. If you don't have food coloring, don't worry, your children can make all types of puffy pictures by using only white.
*paint brush (optional) to paint pictures OR just use your fingers
*a craft stick or something to mix the shaving cream and glue and to mix colors
*paper plates, or Styrofoam plates or anything to mix "paint" in
*scissors (optional) These can be used to cut small pieces of construction paper if you want to decorate your child's drawing
*school glue
*newspaper or a plastic table cloth or something to protect surface (optional if your children are painting on a surface you want to protect.


NOTE* Always supervise young children during this project as shaving cream and glue are not an edible products.

Directions:
Mix shaving cream and glue in equal parts. Use a craft stick to stir colors.
If you choose to have other colors, separate some of the mixture in other containers. Make colors by adding a drop or two of food food coloring.

Paint tips:

Unlike regular paint, shaving cream paint can be used in big globs to make three dimensional paintings. When your children are finished painting, set the art work aside and allow to dry over night.

Accents: You may cut small pieces of construction paper to accent your drawing while it is wet. An example might be:  if making a snowman, you could add a small orange construction paper nose or black pieces or paper for buttons.

You can also accent with scraps of material or other small craft items. Use whatever your have on hand. Let your children's imagination soar. You might be really surprised what they come up with.

What to do if you don't have shaving cream:
Try mixing a bit of child safe paint with some hand lotion for some nice finger paint. The little ones will love it. It won't dry puffy, but they will still have lots of fun. The clean up seems a bit better when a little hand lotion is mixed in with the paint. 

This is a wonderful project. Your children will love it and so will your budget.
I hope you enjoy it.
Thanks for stopping by my blog today.
I hope you will visit again soon.

Friday, August 7, 2015

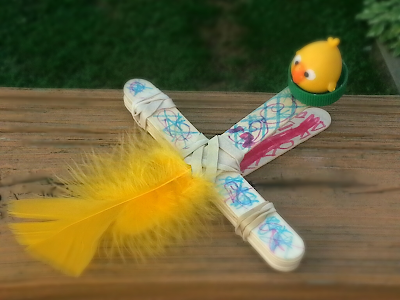
Build A Craft Stick Catapult With Your Kids. Summer Fun Tutorial


Are you looking for something both fun and frugal to do with your kids for a summer activity?
Something that would occupy hours of family fun and guarantee laughter, all while not draining the family bank account? If you are, you are not alone. Many families find themselves in this predicament over summer. This is the time when families are supposed to have fun together. Besides having fun with my children, I am always trying to come up with activities for children at our community center as well. Building this inexpensive catapult definitely was a big hit with all the children of varying ages who built one. This toy brought hours of fun to many. I am sharing this here so that you can build one too.

What you need:
Tongue depressor's or craft sticks (we used 8 for each catapult)
Rubber bands
Plastic soda or water bottle cap
Hot Glue or glue to attach plastic lid to catapult. (We used hot glue because it was faster )

Optional:
Something to use in the catapult as ammunition (we used a small plastic bird that resembles those other birds that are so angry)
Markers and/or items of choice to decorate your catapult

Directions:
Begin by putting 2 craft sticks together. Rubber band only one end together.


Next, stack 6 sticks one on top the other. Rubber band the stack together at each end.


Slide the stack of 6 inside the initial 2 sticks so that the 2 sticks are spit apart. Slide the stack in to the
banded side of the two sticks.
Next, use a rubber band to attach the set of two sticks together at the center point of where they connect or intersect.

Using hot glue (or craft glue if you prefer) attach the bottle cap to the top of the open end of the two sticks.

**Please do not allow children to use or operate a hot glue gun. This should be done by adults only!

Use markers or any other items you like to decorate your catapult. As you can see, we used markers and glued a feather to the end.
We placed our bird in the cap. You might choose to use another item for ammo such as an eraser,marshmallow or even crumpled paper.
To fire your catapult, place your ammo of choice in the bottle cap. Push down on the end and release. Remember to wear safety glasses and to shoot in only one direction.

If your catapult doesn't shoot in the direction you like or shoots too high, you can adjust the position of the craft stick bundle to change the direction of your fired ammo. 

*You will need some item to stack up so that your catapult can knock it down. We used stacked wooden blocks. You may stack all sorts of items, such as plastic action figures or small plastic cups, etc. Shoot to knock down stacks of something or aim to land in a small waste basket.

The children built lots of catapults and had hours of fun. This is a great summer project.

Have fun building your catapult.
Thanks for visiting my blog today.


LinkWithin

Related Posts with Thumbnails